

Purpose and Use Case
One of my primary interests in using AWS is its ease-of-use in provisioning IoT devices and hooking services up. Adding rules to save data to DynamoDB is a lot easier than learning MySQL, MongoDB, etc.
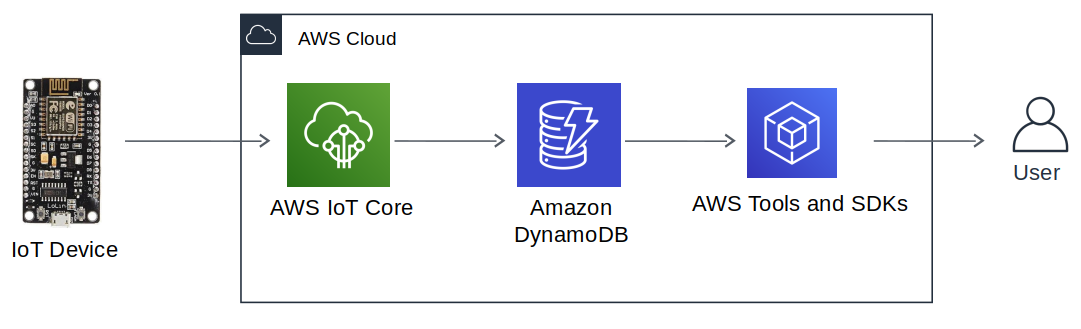
Below is the architecture I'm exploring to bring my project, The Automated Farmer into the cloud.
As a new React developer, it can be confusing to follow the AWS Amplify documentation to interact with existing AWS Services.
This is a quick article to create a DynamoDB table and interact with it from a React.js application. We will use the AWS Javascript SDK and AWS Amplify.
Getting Started
If this is your first time using AWS Amplify I recommend reading their Getting Started guide for React. I've also written a post on connecting a React app to AWS IoT, which is a relevant building block for this article.
For completeness of the tutorial I will outline the following steps:
- Creating a new DynamoDB table
- Adding "fake" sensor data to the table
- Configuring permissions for Cognito users to access the table
- Code snippet to scan the table.
After creating a new AWS Amplify project, go to Services on the AWS Console and select DynamoDB. Click on Create a Table. You come to a page where you can define the Table Name, Primary Key, and Partition Key. For example:
- Table Name: sensor_data
- Partition Key: sensor_name
- Sort Key: timestamp
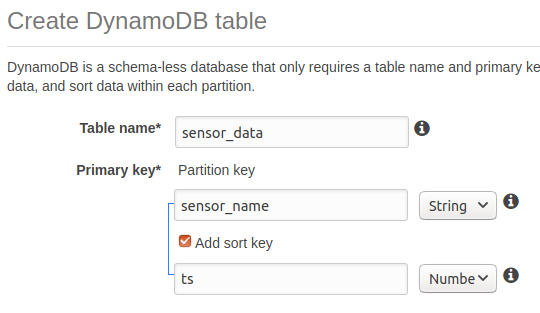
This makes it possible to sort the data by timestamp, which is one of the main use-cases for collecting environmental sensor data.
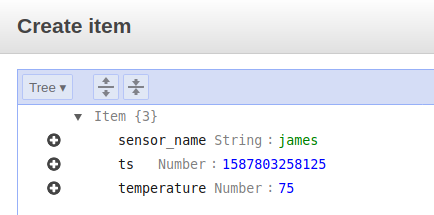
Click on Create, it should take a few seconds. Next click on Create item and add a fake sensor reading:
- Sensor Name: james
- Timestamp (In milliseconds): 1587803258125
- Temperature (What we're measuring): 75
Now we can move onto scanning the table from our React app.
Setting up permissions for Cognito users
Before moving on you should be sure you have a React project set up with AWS Amplify. It might help to read my other tutorial, which outlines finding Cognito user credentials.
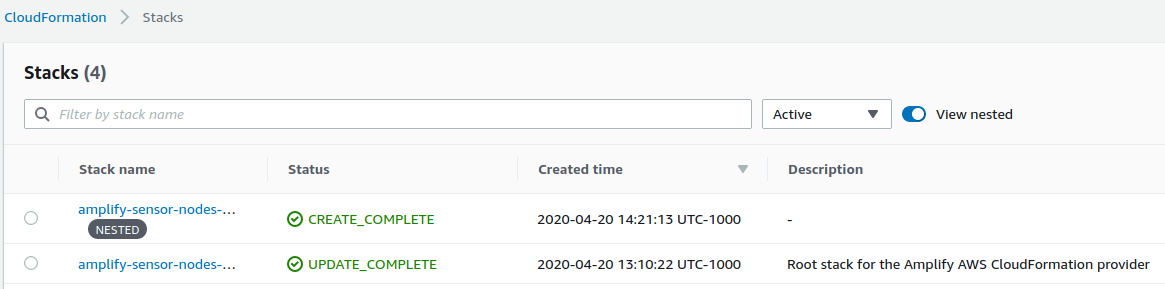
Open the Services tab on AWS Console and go to CloudFormation. You should have a table of Stacks such as the following:
Select the Resources tab and and click on Auth Role > Physical ID. The IAM console will open, which you then click on Attach Policies.
Search for AmazonDynamoDBReadOnlyAccess, check it, and select Attach Policy.
Connecting Everything to React
With the Cognito user set up to access the DynamoDB tables we can add the following code snippet to an existing component.
First import the packages:
import React from 'react';
import Card from 'react-bootstrap/Card';
import Amplify from 'aws-amplify';
import awsconfig from './../aws-exports';
import '@aws-amplify/ui/dist/style.css';
import { Auth } from 'aws-amplify';
import DynamoDB from 'aws-sdk/clients/dynamodb';

Amplify.configure(awsconfig);
Then setup the parameters:
// Parameters to scan the DynamoDB table

// Use datumVal to scan 24 hours of previous data
var datumVal = new Date() - 86400000;
var params = {
    TableName: 'sensor_data',
    KeyConditionExpression: '#id = :iottopic and #ts >= :datum',
    ExpressionAttributeNames: {
      "#id": "sensor_name",
      "#ts": "ts"
    },
    ExpressionAttributeValues: {
      ":iottopic": { "S" : "james"},
      ":datum": { "N" : datumVal.toString()}
    }
 };
Now the table can be accessed. We print the sensor reading and timestamp to the console:
 Auth.currentCredentials()
  .then(credentials => {
    const db= new DynamoDB({
      region: "us-west-2",
      credentials: Auth.essentialCredentials(credentials)
    });
    db.query(params, function(err, data) {
        if (err) {
        console.log(err);
        return null;
        } else {

        console.log('Got data');
        console.log(data);

        for (var i in data['Items']) {
            // read the values from the dynamodb JSON packet
            var tempRead = parseFloat(data['Items'][i]['temperature']['N']);
            var timeStamp = parseInt(data['Items'][i]['ts']['N']);
            var timeRead = new Date(timeStamp);
            console.log(timeRead);
            console.log(tempRead);
            }
        }
    })
  });
The result should be available in the console:

With data being read from DynamoDB we can start adding graphs and building up an AWS powered IoT dashboard.
Thank you for reading, if you find any trouble setting up a similar scenario please reach out via email.